**********************实战篇**************************
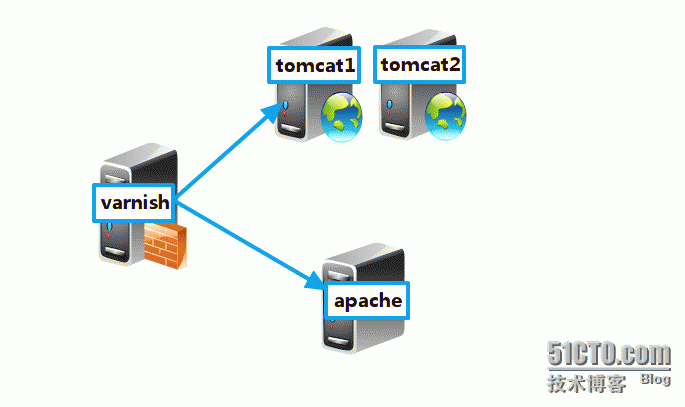
一、实验拓扑图和环境的介绍

环境介绍:
OS: RHEL 6.4
IP地址规划
varnish:172.16.22.5
tomcat1:172.16.22.6
tomcat2:172.16.22.7
apache:172.16.22.8
tomcat上面搭建一个JspRun论和apache联合测试动静分离
二、各服务器软件的安装
varnish:
#==============下载软件后用yum安装=================================
[root@varnish ~]# ls
anaconda-ks.cfg install.log.syslog varnish-docs-3.0.4-1.el6.x86_64.rpm
install.log varnish-3.0.4-1.el6.x86_64.rpm varnish-libs-3.0.4-1.el6.x86_64.rpm
[root@varnish ~]# yum -y --nogpgcheck install varnish-*.rpm
#==============配置varnish的参数=============================
[root@varnish ~]# grep -v "#" /etc/sysconfig/varnish | grep -v "^$"
NFILES=131072
MEMLOCK=82000
NPROCS="unlimited"
RELOAD_VCL=1
VARNISH_VCL_CONF=/etc/varnish/default.vcl
VARNISH_LISTEN_PORT=80
VARNISH_ADMIN_LISTEN_ADDRESS=127.0.0.1
VARNISH_ADMIN_LISTEN_PORT=6082
VARNISH_SECRET_FILE=/etc/varnish/secret
VARNISH_MIN_THREADS=50
VARNISH_MAX_THREADS=1000
VARNISH_THREAD_TIMEOUT=120
VARNISH_STORAGE_FILE=/var/lib/varnish/varnish_storage.bin
VARNISH_STORAGE_SIZE=1G
VARNISH_MEMORY_SIZE=64M
VARNISH_STORAGE="malloc,${VARNISH_MEMORY_SIZE}"
VARNISH_TTL=120
DAEMON_OPTS="-a ${VARNISH_LISTEN_ADDRESS}:${VARNISH_LISTEN_PORT} \
-f ${VARNISH_VCL_CONF} \
-T ${VARNISH_ADMIN_LISTEN_ADDRESS}:${VARNISH_ADMIN_LISTEN_PORT} \
-t ${VARNISH_TTL} \
-w ${VARNISH_MIN_THREADS},${VARNISH_MAX_THREADS},${VARNISH_THREAD_TIMEOUT} \
-u varnish -g varnish \
-S ${VARNISH_SECRET_FILE} \
-s ${VARNISH_STORAGE}"
#=====================开启varnish==============================
[root@varnish ~]# service varnish start
Starting Varnish Cache: [ OK ]
[root@varnish ~]#chkconfig --add varnish
[root@varnish ~]#chkconfig varnish on
tomcat1&tomcat2:安装软件的方法都是一样
#============下载所需的软件==============================
[root@tomcat1 ~]# ls
anaconda-ks.cfg install.log jdk-7u9-linux-x64.rpm
apache-tomcat-7.0.42.tar.gz install.log.syslog JspRun!_6.0.0_GBK.zip
#==================安装java开发工具包,jdk=================
[root@tomcat1 ~]# rpm -ivh jdk-7u9-linux-x64.rpm
Preparing... #################################### [100%]
1:jdk #################################### [100%]
#==============安装tomcat==================================
[root@tomcat1 ~]# tar xf apache-tomcat-7.0.42.tar.gz -C /usr/local/
#=============解压JspRun论坛程序===========================
[root@tomcat1 ~]# unzip JspRun\!_6.0.0_GBK.zip
#============安装mysql=====================================
[root@tomcat1 ~]# yum -y install mysql-server
[root@tomcat1 ~]# cd /usr/local/
[root@tomcat1 local]# ln -sv apache-tomcat-7.0.42 tomcat
`tomcat' -> `apache-tomcat-7.0.42'
[root@tomcat1 local]# cd /etc/profile.d/
#=============建立java的环境变量===========================
[root@tomcat1 profile.d]# cat java.sh
export JAVA_HOME=/usr/java/latest
export PATH=$JAVA_HOME/bin:$PATH
[root@tomcat1 profile.d]# source java.sh
#============建立tomcat的环境变量==========================
[root@tomcat1 profile.d]# cat tomcat.sh
export CATALINA_HOME=/usr/local/tomcat
export PATH=$CATALINA_HOME/bin:$PATH
[root@tomcat1 profile.d]# source tomcat.sh
#=============检查java是否安装成功==========================
[root@tomcat1 profile.d]# java -version
java version "1.7.0_09"
Java(TM) SE Runtime Environment (build 1.7.0_09-b05)
Java HotSpot(TM) 64-Bit Server VM (build 23.5-b02, mixed mode)
#========出现 Server字样表示安装成功==========================
[root@tomcat1 profile.d]# cd /usr/local/tomcat/conf/
#======修改tomcat的配置文件===================================
[root@tomcat1 conf]# vim server.xml
<Connector port="80" protocol="HTTP/1.1" #修改监听的端口为80
connectionTimeout="20000"
redirectPort="8443" />
<Engine name="Catalina" defaultHost="www.bbs.com">
#把默认的主机改为新建的bbs主机
<Host name="www.bbs.com" appBase="/tomcat/bbs" #新建一个bbs的虚拟主机
unpackWARs="true" autoDeploy="true">
<Context path="" docBase="/tomcat/bbs" />
<Valve className="org.apache.catalina.valves.AccessLogValve" directory="logs"
prefix="bbs_access_log." suffix=".txt"
pattern="%h %l %u %t "%r" %s %b" />
</Host>
</Engine>
#======================创建存放虚拟主机文件的目录================
[root@tomcat1 conf]# mkdir -pv /tomcat/bbs
mkdir: created directory `/tomcat'
mkdir: created directory `/tomcat/bbs'
#=============把解压的论坛程序copy到虚拟主机目录下================
[root@tomcat1 conf]# cp -rp /root/upload/* /tomcat/bbs/
#============开启tomcat=====================================
[root@tomcat1 conf]# catalina.sh start
Using CATALINA_BASE: /usr/local/tomcat
Using CATALINA_HOME: /usr/local/tomcat
Using CATALINA_TMPDIR: /usr/local/tomcat/temp
Using JRE_HOME: /usr/java/latest
Using CLASSPATH: /usr/local/tomcat/bin/bootstrap.jar:/usr/local/tomcat/bin/tomcat-juli.jar
#==========开启mysql===================================
[root@tomcat1 conf]# service mysqld start
Starting mysqld: [ OK ]
[root@tomcat1 conf]# mysqladmin -uroot password 'mypass'
[root@tomcat1 conf]# mysql -uroot -pmypass
#=======创建论坛的数据库,和给用户授权============================
mysql> create database jsprun;
Query OK, 1 row affected (0.00 sec)
mysql> grant all on jsprun.* to 'jspuser'@'172.16.%.%' identified by 'jspmypass';
Query OK, 0 rows affected (0.00 sec)
mysql> flush privileges;
Query OK, 0 rows affected (0.00 sec)
mysql> \q
Bye
#=============把论坛程序copy到apache服务器上去=====================
[root@tomcat1 conf]# scp -rp /tomcat/bbs/* 172.16.22.8:/var/www/html/
接下来安装JspRun论坛,这里不再介绍 详情请点击这里
apache:
1
[root@apache ~]# yum -y install httpd
三、varnish记录日志和后端服务器的日志记录
1)、varnish为后端server做代理
[root@varnish ~]# cd /etc/varnish/
#======创建varnish的配置文件,varnish有默认的配置文件我default.vcl,这里博主
新建一个varnish的配置文件test.vcl===================================
[root@varnish varnish]# cat test.vcl
backend apache {
.host = "172.16.22.8";
.port = "80";
}
#==============重新加载varnish的配置文件========================
#===========通过varnishadm管理varnish===================
[root@varnish varnish]# varnishadm -S /etc/varnish/secret -T
#======用vcl.load命令加载新建的配置文件test.vcl,a1为随便命名=========
varnish> vcl.load a1 ./test.vcl
200
VCL compiled.
#=====使刚才加载的配置文件为活动状态=========================
varnish> vcl.use a1
200
varnish>
2)、后端apache server的配置
[root@apache ~]# echo "<h1> static,apache server </h1>" >/var/www/html/test.html
[root@apache ~]# service httpd start
3)、查看varnish的日志和后端apache server的配置日志
#=====开两个终端一个用curl测试==============================
[root@varnish varnish]# curl http://172.16.22.5/test.html
<h1> static,apache server </h1>
#=========一个用varnishlog查看日志=========================
#==varnish的日志是保存在内存中,varnish有默认的日志滚动机制==========
[root@varnish varnish]# varnishlog
11 SessionOpen c 172.16.22.5 45379 :80
11 ReqStart c 172.16.22.5 45379 910368572
11 RxRequest c GET
11 RxURL c /test.html
11 RxProtocol c HTTP/1.1
11 RxHeader c User-Agent: curl/7.19.7 (x86_64-redhat-linux-gnu) libcurl/7.19.7 NSS/3.14.0.0 zlib/1.2.3 libidn/1.18 libssh2/1.4.2
11 RxHeader c Host: 172.16.22.5
11 RxHeader c Accept: */*
11 VCL_call c recv lookup
11 VCL_call c hash
11 Hash c /test.html
11 Hash c 172.16.22.5
11 VCL_return c hash
11 Hit c 910368571
11 VCL_call c hit deliver
11 VCL_call c deliver deliver
11 TxProtocol c HTTP/1.1
11 TxStatus c 200
11 TxResponse c OK
11 TxHeader c Server: Apache/2.2.15 (CentOS)
11 TxHeader c Last-Modified: Sat, 21 Sep 2013 12:28:41 GMT
11 TxHeader c ETag: "6085e-20-4e6e3ed5bc2bb"
11 TxHeader c Content-Type: text/html; charset=UTF-8
11 TxHeader c Content-Length: 32
11 TxHeader c Accept-Ranges: bytes
11 TxHeader c Date: Fri, 09 Aug 2013 04:09:04 GMT
11 TxHeader c X-Varnish: 910368572 910368571
11 TxHeader c Age: 25
11 TxHeader c Via: 1.1 varnish
11 TxHeader c Connection: keep-alive
11 Length c 32
11 ReqEnd c 910368572 1376021344.068876505 1376021344.069193125 0.000392437 0.000097752 0.000218868
11 SessionClose c EOF
11 StatSess c 172.16.22.5 45379 0 1 1 0 0 0 331 32
#================查看apache记录的日志======================
[root@apache ~]# tail /var/log/httpd/access_log
172.16.22.5 - - [21/Sep/2013:21:21:50 +0800] "GET /test.html HTTP/1.1" 200 32 "-" "curl/7.19.7 (x86_64-redhat-linux-gnu) libcurl/7.19.7 NSS/3.14.0.0 zlib/1.2.3 libidn/1.18 libssh2/1.4.2"
从上面可以看出,后端apache server记录的是前端varnish的日志,然而这些日志对apache是无用的,apache应该记录访问客户端的日志
4)、修改varnish和apache的配置,使其apache记录访问客户端的日志
#=========修改varnish的配置文件======================
[root@varnish varnish]# cat test.vcl
backend apache {
.host = "172.16.22.8";
.port = "80";
}
sub vcl_recv {
set req.http.X-Forward-For = client.ip;
if (req.url ~ "\.(html)$" ) {
return(pass);
}
set req.backend = apache;
}
#===============重新加载varnish的配置文件=====================
[root@varnish varnish]# varnishadm -S /etc/varnish/secret -T 127.0.0.1:6082
varnish> vcl.load a2 ./test.vcl #每加载一次这个名称都需要改变
200
VCL compiled.
varnish> vcl.use a2
200
#============修改apache的日志相关的配置=====================
[root@apache ~]# vim /etc/httpd/conf/httpd.conf
LogFormat "%{X-Forward-For}i %l %u %t \"%r\" %>s %b \"%{Referer}i\" \"%{User-Agent}i\"" combined
LogFormat "%h %l %u %t \"%r\" %>s %b" common
LogFormat "%{Referer}i -> %U" referer
LogFormat "%{User-agent}i" agent
[root@apache ~]# service httpd restart
Stopping httpd: [ OK ]
Starting httpd: [ OK ]
[root@apache ~]#
5)、用浏览器进行测试,查看apache的日志记录


四、varnish缓存命中的测试
此前已经验证了是可以通过访问varnish而得到结果,则这是用到了varnish的反向代理功能,如何验证varnish的缓存,而且确实varnish的缓存起到作用了。
#===============修改varnish的配置文件========================
[root@varnish varnish]# cat test.vcl
backend apache {
.host = "172.16.22.8";
.port = "80";
}
sub vcl_recv {
set req.http.X-Forward-For = client.ip;
if (req.url ~ "\.(html)$" ) {
return(lookup);
}
set req.backend = apache;
}
sub vcl_fetch {
if (req.request == "GET" && req.url ~ "\.(html|jpg|jpeg)$") {
set beresp.ttl = 3600s;
}
}
sub vcl_deliver {
if (obj.hits > 0) {
set resp.http.X-Cache = "HIT from" + " " + server.ip;
} else {
set resp.http.X-Cache = "MISS";
}
return(deliver);
}
#===============重新加载varnish的配置文件=====================
[root@varnish varnish]# varnishadm -S /etc/varnish/secret -T 127.0.0.1:6082
varnish> vcl.load a3 ./test.vcl
200
VCL compiled.
varnish> vcl.use a3
200
#========测试是否缓存命中==================================
[root@varnish varnish]# curl -I http://172.16.22.5/test.html
HTTP/1.1 200 OK
Server: Apache/2.2.15 (CentOS)
Last-Modified: Sat, 21 Sep 2013 12:28:41 GMT
ETag: "6085e-20-4e6e3ed5bc2bb"
Content-Type: text/html; charset=UTF-8
Content-Length: 32
Accept-Ranges: bytes
Date: Fri, 09 Aug 2013 04:59:04 GMT
X-Varnish: 910368607
Age: 0
Via: 1.1 varnish
Connection: keep-alive
X-Cache: MISS #=====第一次测试为MISS================
[root@varnish varnish]# curl -I http://172.16.22.5/test.html
HTTP/1.1 200 OK
Server: Apache/2.2.15 (CentOS)
Last-Modified: Sat, 21 Sep 2013 12:28:41 GMT
ETag: "6085e-20-4e6e3ed5bc2bb"
Content-Type: text/html; charset=UTF-8
Content-Length: 32
Accept-Ranges: bytes
Date: Fri, 09 Aug 2013 04:59:05 GMT
X-Varnish: 910368608 910368607
Age: 1
Via: 1.1 varnish
Connection: keep-alive
X-Cache: HIT from 172.16.22.5 #=======第二次测试为hit=========
五、varnish的负载均衡
#====================修改varnish的配置文件========================
[root@varnish varnish]# cat test.vcl
backend apache {
.host = "172.16.22.8";
.port = "80";
}
backend tomcat1 {
.host = "172.16.22.6";
.port = "80";
}
backend tomcat2 {
.host = "172.16.22.7";
.port = "80";
}
director tomcats random {
.retries = 2;
{
.backend = tomcat1;
.weight = 1;
}
{
.backend = tomcat2;
.weight = 1;
}
}
sub vcl_recv {
set req.http.X-Forward-For = client.ip;
if (req.url ~ "\.(html)$" ) {
return(lookup);
}
if (req.url ~ "\.(jsp)$") {
set req.backend = tomcats;
}
}
sub vcl_fetch {
if (req.request == "GET" && req.url ~ "\.(html|jpg|jpeg)$") {
set beresp.ttl = 3600s;
}
}
sub vcl_deliver {
if (obj.hits > 0) {
set resp.http.X-Cache = "HIT from" + " " + server.ip;
} else {
set resp.http.X-Cache = "MISS";
}
return(deliver);
}
#===============重新加载varnish的配置文件=====================
[root@varnish varnish]# varnishadm -S /etc/varnish/secret -T 127.0.0.1:6082
varnish> vcl.load a4 ./test.vcl
200
VCL compiled.
varnish> vcl.use a4
200
#=================分别在tomcat1&tomcat2上建立tomcat的测试文件=======
[root@tomcat1 ~]# cat /tomcat/bbs/test.jsp
<%@ page language="java" %>
<%@ page import="java.util.*" %>
<html>
<head>
<title>JSP test page.</title>
</head>
<body>
<% out.println("Hello,tomcat1"); %>
</body>
</html>
测试tomcat的负载均衡


六、varnish动静分离
#====================修改varnish的配置文件=========================
[root@varnish varnish]# cat test.vcl
backend apache {
.host = "172.16.22.8";
.port = "80";
}
backend tomcat1 {
.host = "172.16.22.6";
.port = "80";
}
backend tomcat2 {
.host = "172.16.22.7";
.port = "80";
}
director tomcats random {
.retries = 2;
{
.backend = tomcat1;
.weight = 1;
}
{
.backend = tomcat2;
.weight = 1;
}
}
sub vcl_recv {
set req.http.X-Forward-For = client.ip;
if (req.url ~ "\.(html)$" ) {
return(lookup);
}
if (req.url ~ "\.(jsp)$") {
set req.backend = tomcats;
} else {
set req.backend = apache;
}
}
sub vcl_fetch {
if (req.request == "GET" && req.url ~ "\.(html|jpg|jpeg)$") {
set beresp.ttl = 3600s;
}
}
sub vcl_deliver {
if (obj.hits > 0) {
set resp.http.X-Cache = "HIT from" + " " + server.ip;
} else {
set resp.http.X-Cache = "MISS";
}
return(deliver);
}
#===============重新加载varnish的配置文件=====================
[root@varnish varnish]# varnishadm -S /etc/varnish/secret -T 127.0.0.1:6082
varnish> vcl.load a5 ./test.vcl
200
VCL compiled.
varnish> vcl.use a5
200
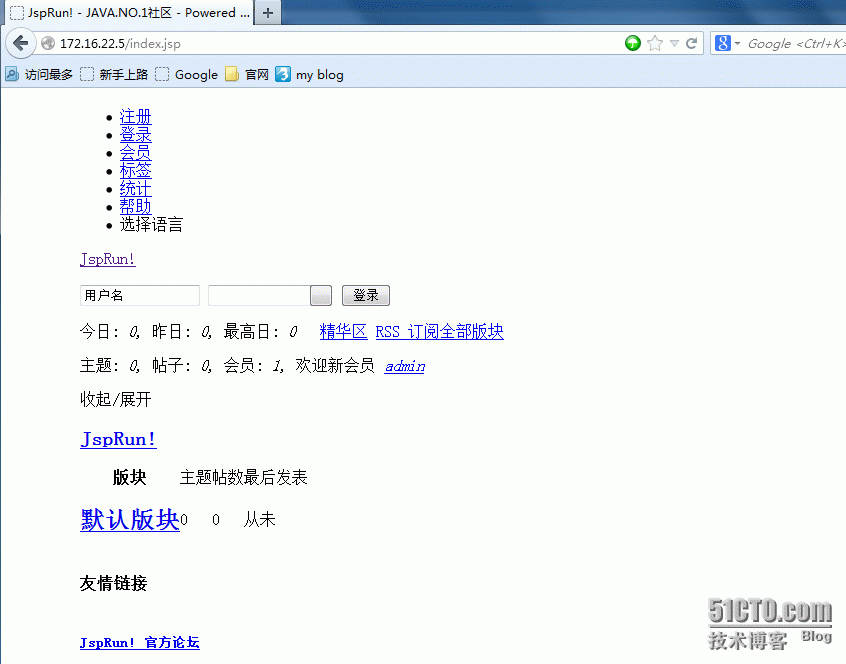
为了验证是动静分离的效果,我先把后端的apache的httpd停掉,看访问JspRun论坛出现啥效果
[root@apache ~]# service httpd stop
Stopping httpd: [ OK ]

论坛css样式,图片等显示不出来
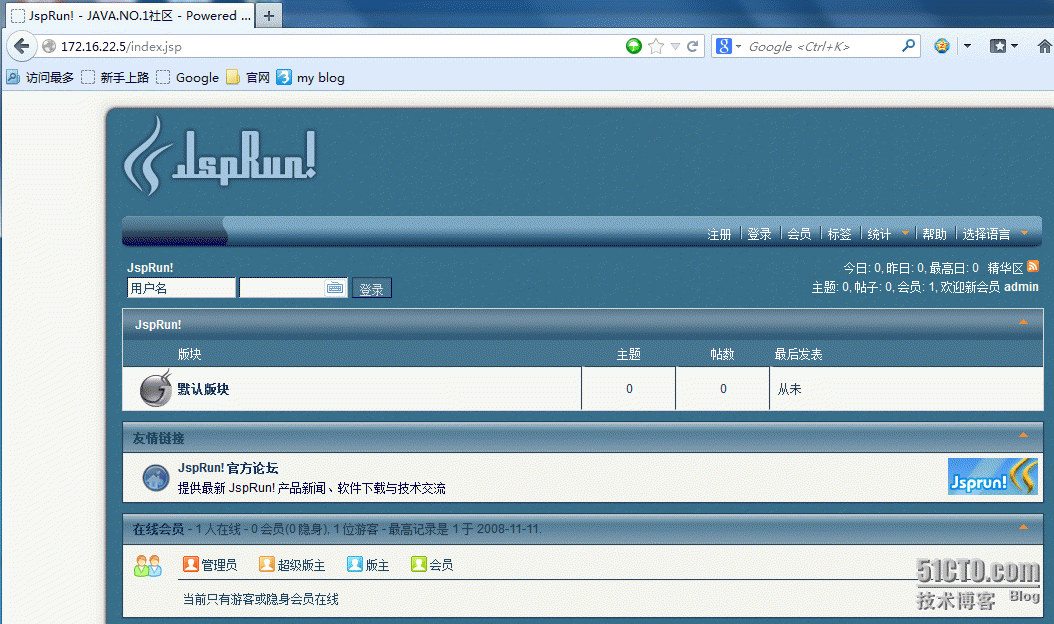
然后开启后端apache的httpd服务,访问JspRun论坛出现啥效果
[root@apache ~]# service httpd start
Starting httpd: [ OK ]

七、varnish对后端server的健康状态的检查
在实际生产环境中对后端server进行健康状态检查的时候静态的在网页根目录创建一个test.html检测页面,动态的在网页根目录先创建一个test.jsp的检测页面
probe static_chk {
.url = "/test.html";
.interval = 2s;
.timeout = 2s;
.expected_response = 200;
}
probe dynamic_chk {
.url = "/test.jsp";
.interval = 2s;
.timeout = 2s;
.expected_response = 200;
}
backend apache {
.host = "172.16.22.8";
.port = "80";
.probe = static_chk;
}
backend tomcat1 {
.host = "172.16.22.6";
.port = "80";
.probe = dynamic_chk;
}
backend tomcat2 {
.host = "172.16.22.7";
.port = "80";
.probe = dynamic_chk;
}
director tomcats random {
.retries = 2;
{
.backend = tomcat1;
.weight = 1;
}
{
.backend = tomcat2;
.weight = 1;
}
}
sub vcl_recv {
set req.http.X-Forward-For = client.ip;
if (req.url ~ "\.(html)$" ) {
return(lookup);
}
if (req.url ~ "\.(jsp)$") {
set req.backend = tomcats;
} else {
set req.backend = apache;
}
}
sub vcl_fetch {
if (req.request == "GET" && req.url ~ "\.(html|jpg|jpeg)$") {
set beresp.ttl = 3600s;
}
}
sub vcl_deliver {
if (obj.hits > 0) {
set resp.http.X-Cache = "HIT from" + " " + server.ip;
} else {
set resp.http.X-Cache = "MISS";
}
return(deliver);
}
#===============重新加载varnish的配置文件=====================
[root@varnish varnish]# varnishadm -S /etc/varnish/secret -T 127.0.0.1:6082
varnish> vcl.load a6 ./test.vcl
200
VCL compiled.
varnish> vcl.use a6
200
#============查看后端server的健康状态==========================
#===当测试页面都存在的时候健康状态检测情况=============
[root@varnish ~]# varnishlog
0 CLI - Rd ping
0 CLI - Wr 200 19 PONG 1376032176 1.0
0 Backend_health - apache Still healthy 4--X-RH 8 3 8 0.011860 0.012733 HTTP/1.1 200 OK
0 Backend_health - tomcat2 Still healthy 4--X-RH 8 3 8 0.021719 0.017891 HTTP/1.1 200 OK
0 Backend_health - tomcat1 Still healthy 4--X-RH 8 3 8 0.021498 0.019532 HTTP/1.1 200 OK
0 Backend_health - apache Still healthy 4--X-RH 8 3 8 0.010489 0.012172 HTTP/1.1 200 OK
0 Backend_health - tomcat2 Still healthy 4--X-RH 8 3 8 0.025848 0.019880 HTTP/1.1 200 OK
0 Backend_health - tomcat1 Still healthy 4--X-RH 8 3 8 0.022760 0.020339 HTTP/1.1 200 OK
0 CLI - Rd ping
#===当静态的测试页面不存在的时候健康状态检测情况=============
[root@varnish ~]# varnishlog
0 Backend_health - tomcat2 Still healthy 4--X-RH 8 3 8 0.017432 0.015385 HTTP/1.1 200 OK
0 Backend_health - tomcat1 Still healthy 4--X-RH 8 3 8 0.032537 0.022571 HTTP/1.1 200 OK
0 Backend_health - apache Still healthy 4--X-R- 3 3 8 0.013448 0.013863 HTTP/1.1 404 Not Found #发现静态服务不能工作
0 CLI - Rd ping
0 CLI - Wr 200 19 PONG 1376032579 1.0
0 Backend_health - tomcat2 Still healthy 4--X-RH 8 3 8 0.012840 0.014748 HTTP/1.1 200 OK
0 Backend_health - tomcat1 Still healthy 4--X-RH 8 3 8 0.015876 0.020897 HTTP/1.1 200 OK
0 Backend_health - apache Went sick 4--X-R- 2 3 8 0.010309 0.013863 HTTP/1.1 404 Not Found
#===当静态的服务不存在的时候健康状态检测情况=============
[root@varnish ~]# varnishlog
0 Backend_health - tomcat1 Still healthy 4--X-RH 8 3 8 0.017558 0.017736 HTTP/1.1 200 OK
0 Backend_health - tomcat2 Still healthy 4--X-RH 8 3 8 0.017711 0.015071 HTTP/1.1 200 OK
0 Backend_health - apache Still sick ------- 0 3 8 0.000000 0.013158
# 检测apache没有200的状态响应
0 Backend_health - tomcat1 Still healthy 4--X-RH 8 3 8 0.022980 0.019047 HTTP/1.1 200 OK
0 CLI - Rd ping
0 CLI - Wr 200 19 PONG 1376032663 1.0
0 Backend_health - tomcat2 Still healthy 4--X-RH 8 3 8 0.014621 0.014958 HTTP/1.1 200 OK
0 Backend_health - apache Still sick ------- 0 3 8 0.000000 0.013158
0 Backend_health - tomcat1 Still healthy 4--X-RH 8 3 8 0.025766 0.020727 HTTP/1.1 200 OK
0 Backend_health - tomcat2 Still healthy 4--X-RH 8 3 8 0.014910 0.014946 HTTP/1.1 200 OK
八、varnish实现防盗链
[root@varnish varnish]# cat test.vcl
probe static_chk {
.url = "/test.html";
.interval = 2s;
.timeout = 2s;
.expected_response = 200;
}
probe dynamic_chk {
.url = "/test.jsp";
.interval = 2s;
.timeout = 2s;
.expected_response = 200;
}
backend apache {
.host = "172.16.22.8";
.port = "80";
.probe = static_chk;
}
backend tomcat1 {
.host = "172.16.22.6";
.port = "80";
.probe = dynamic_chk;
}
backend tomcat2 {
.host = "172.16.22.7";
.port = "80";
.probe = dynamic_chk;
}
director tomcats random {
.retries = 2;
| 请您注册登录超级码客,加载全部码客文章内容... |